 There are various ways of providing a vacuum or resin feed penetration through a vacuum bag. One solution is to run a tube in under the perimeter of the bag and sealing the tube in the perimeter mastic. While generally less reliable from a sealing perspective, the bag film can also be penetrated by a tee or elbow mastic sealed through a hole in the bag film. More reliable bag film penetrations are conical infusion ports or multipart fittings specifically designed for the purpose. Conical infusion ports provide a rigid and easily sealed socket for polyethylene vacuum tubing. If made from a suitable plastic and treated with mould release, these will be reusable many times in resin infusion applications. Multipart bag fittings are not suited to infusion applications because they are not easy to clean, but they are often a good choice for vacuum bagging over wet laid laminate and pre-preg.
We offer both one-piece plastic fittings and multipart screw together bag fittings.
Solid plastic ports for resin infusion applications
Our infusion ports are machined from solid ultra-high molecular weight polyethylene (UHMWPE). This material is resistant to almost all composite industry solvents and resins. These fittings are designed primarily for resin infusion.
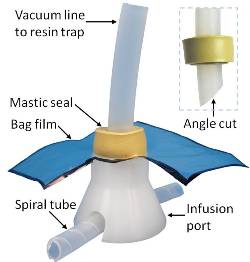
If treated prior to each use with a liquid mould release, these fittings will be reusable many times. Infusion ports are placed on the laminate prior to application of the bag but, usually, they are not penetrated until after the bag has been evacuated. The normal procedure is described below.
- Position the ports on the part, using masking tape or mastic to hold them in position if necessary.
- Place and seal the vacuum bag around the perimeter of the part.
- Apply vacuum to the part through one vacuum connection only. If possible, evacuate the bag via what will become a resin feed line, as this is usually an area of high permeability.
- Check the bag positioning to ensure that the mastic perimeter seal or the bag is not excessively strained. Adjust the bag pleats as required.
- Evacuate the bag to maximum vacuum (unless using a soft core).
- Perform a preliminary leak test and eliminate all leaks.
- Re-evacuate to maximum vacuum.
- Prepare the vacuum tubing connections, ideally with a CLOSED valve inserted in each tube.
- Cut a one-side point on the end of the tube and wrap a ring of mastic around the tube, approximately 20 mm (¾”) above the top end of the cut.
- With the bag under vacuum and each tubing valve closed, stab the sharpened tubing through the bag and into the port. As long as the valves are closed, there will be little air entry as the connections are stabbed in and the bag will continue to hold vacuum.
- Complete the mastic seal around the joint between the tube and the bag.
- Ideally, leak test each joint as it is made.
- Progressively make and test all joints in the same manner.
- Perform a final leak test and proceed with the infusion.
Multipart bag fittings for wet laid laminate and pre-preg vacuum bagging (NOT recommended for resin infusion)
Our multipart bag penetration fittings are designed for applications where resin will not contact the fitting, i.e. in applications where the limited amount of excess resin can be absorbed in bleeder fabric prior to reaching the fitting. Multipart fittings are not suited to resin infusion use.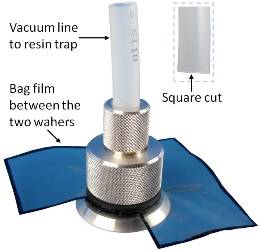
At present, our bag fittings are only made to suit ½” to 13 mm outside diameter (OD) tubing directly. To fit other tubing sizes, adapting tubes will be required. (Adapting to other tubes sizes is usually quite simple. See Vacmans note “Joining polyethylene tubing”.)
Multipart bag fittings are located and sealed to the bag film prior to evacuation of the bag. The typical procedure is described below.
- Mark the bag where the fittings are to be placed.
- Remove the male threaded gland nut, the female threaded body ring and the top washer from the base fitting, but leave the bottom rubber washer on the conical base of the fitting.
- Cut out the smallest possible hole in the bag for the male thread of the fitting to pass through. A square cut-out approximately 20 mm x 20 mm (just over ¾” x ¾”) will usually be simplest to make.
- Place the base of the bag fitting and the bottom rubber washer inside the bag.
- Place the top washer over the thread exposed outside the bag. Fit the female threaded body ring and hand-tighten it while holding the film as wrinkle free as possible.
- Square-cut (do not angle cut) the tube to be inserted into the fitting.
- Fit the smaller nut over the end of the tube and slip the O-ring over the tube.
- Push the tube down to the stop in the recess and hand tighten the smaller nut to compress the O-ring. Do not tighten excessively, as over-tightening may damage the O-ring.
Feedback or queries on this note?
We are keen to improve the accuracy and value of Vacman’s Notes. If you have any feedback or queries regarding this note, or would like to suggest new topics to be covered, Vacman would be pleased to hear from you! Please comment below! Or email [email protected]